


This cake would be perfect for Father’s Day or a male birthday – or a colleague leaving work. It’s really simple to make and you can easily add your own personal touches.
I made this cake as part of an evening class I am taking at South Thames College. The course is aimed at all levels and because it is an evening class with many participants who work full time, we used shop-bought cake. You can of course make a cake yourself; this particular cake doesn’t need carving into a shape (though you will need to trim the top and sides) so you can bake any kind of rectangular cake.
We used madeira cakes from the supermarket though they are not all exactly the same size so a bit of trimming was required.
We started off by covering the cake board then made the tie first, and I’d suggest you do the same. We used a template the tutor, Bridgette, had prepared but you can easily draw and cut out the shape of a tie.

Cover a 14 inch cake board in white fondant, trim the edges and leave to dry. You can also put a ribbon around the edge.
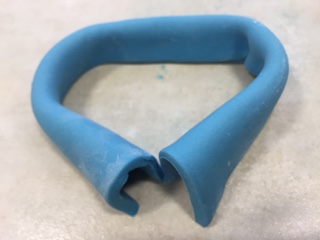
We used flower paste (like modelling paste) with a little sugarpaste (fondant) mixed in, so the tie would dry stiff. Roll out whichever colour you want as a base, and place the template on top, then cut around with a sharp knife, being careful not to drag the edges of the paste.
Do the same with the knot of the tie and the collar part.
I wanted my tie to be stripey so I mixed another colour of flower paste. My tie was royal blue, and for the stripes I mixed a little black into the royal blue to make it darker. I used a thin strip of paper to measure to make sure each stripe was the same width, and that when I placed them on the base of the tie, they were spaced evenly apart. Use a little water or clear alcohol to stick the pieces on.
You can do anything you want with the tie – plain, or polka dots, or rainbow stripes as one person in the class did!
Take the section you have made for the collar and gently fold over so it stands upright. Curl around so it looks like the neckline, and place it on top of the tie knot. Place both parts on top of the tie.

Place the tie in the centre of your cake board to set. I had very carefully prise it off of the board a week later as it had stuck; but I managed to get the tip of a sharp knife underneath. It did make a few holes in the sugarpaste that I had covered the board with but that didn’t matter as the cake itself sits on top.

When you are ready to make the cake, mix 1kg of fondant with a different colour for the shirt. I used sky blue, to go with the royal blue of the tie. If you are making this for a specific person you might want to think about their favourite colour shirt or if they wear a uniform to work!
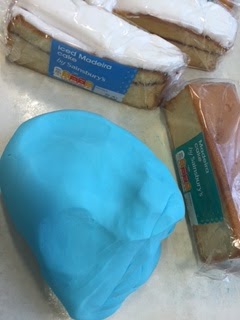
Use buttercream (with jam as well if you wish) to stick the madeira cakes together; or, carefully split and fill your cake. I used five shop-bought madeira cakes, using a mixture of plain and ones with icing and filling.
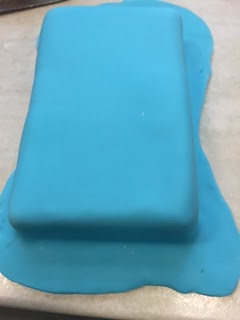
Trim the top of the cake so it is completely flat, and trim the sides as well if they need to be neatened up. Cover the top and sides with buttercream and smooth over.
Roll out your fondant and cover the cake, then trim off the excess. A cake smoother is a useful tool to get the corners sharp and the top and sides flat and smooth.
Lifting the cake onto the cake board is not easy, especially if you have stuck smaller cakes together! Bridgette, the tutor, helped each of us in turn; you need to slide two palette knives under the cake vertically and another one or two horizontally, and have two people lift it at the same time. Place the cake carefully on the cake board.
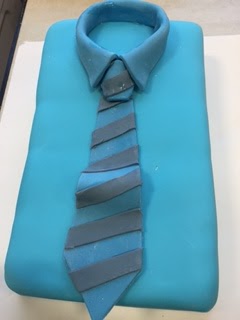
Arrange the tie on top and stick down with a little water or clear alcohol. You can also make a pocket but I felt my cake was a bit too narrow and there wasn’t enough space.
Most of the class had never done lettering before and I’ve never done a particularly good job; I recently bought myself a set of FMM Tappit Cutters in the ‘funky’ style. These letters are fairly large so probably not ideal for writing ‘happy birthday’ or ‘happy birthday’, but they are great for shorter words, names and ages. I love the way that they look!
There is a knack to using these which I will explain. First you need to grease the cutter with some Trex (vegetable fat) and then remove any excess using a cocktail stick.
Roll out some flower or modelling paste; I used the same colour as the stripes on the tie as I had some left over. Make sure your surface is dusted with icing sugar; press down the cutter and move it around on the worktop using the palm of your hand. Lift the cutter and remove the excess paste; you will see your letter firmly stuck inside the cutter. These are thin and fragile which means if you try to extract it using a cocktail stick you will ruin it. The reason they are called Tappits is that you tap it on the edge of the worktop. I alternated between a short sharp tap and ‘twanging’ it slightly like you might a ruler; the letter should dislodge and fall out by itself.

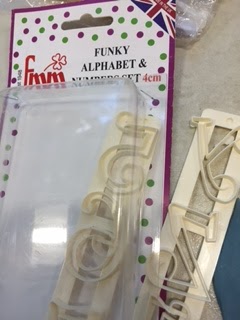
Carefully pick it up – you could use tweezers but I used my fingers – and lay it out on the cake board so that you can make sure all the letters will fit before you stick them down. Use a paintbrush to dab some water onto the back of the letters to stick them down when you are happy.
As I said, this is a simple cake, in that it is a plain rectangle, covered with sugarpaste, and you can leave out the lettering if you like. I think that with the matching tie and the letters it looks really professional and I’m really pleased with it – my dad will be getting this on Father’s Day!

I’m sharing this with the Food Year Linkup, hosted by Charlotte's Lively Kitchen
and also with Love Cake, hosted by Ness at JibberJabberUK.


0 comments:
Post a Comment